git fetch --all
Install GitLens extension in vscode
git config --global core.editor "code --wait"
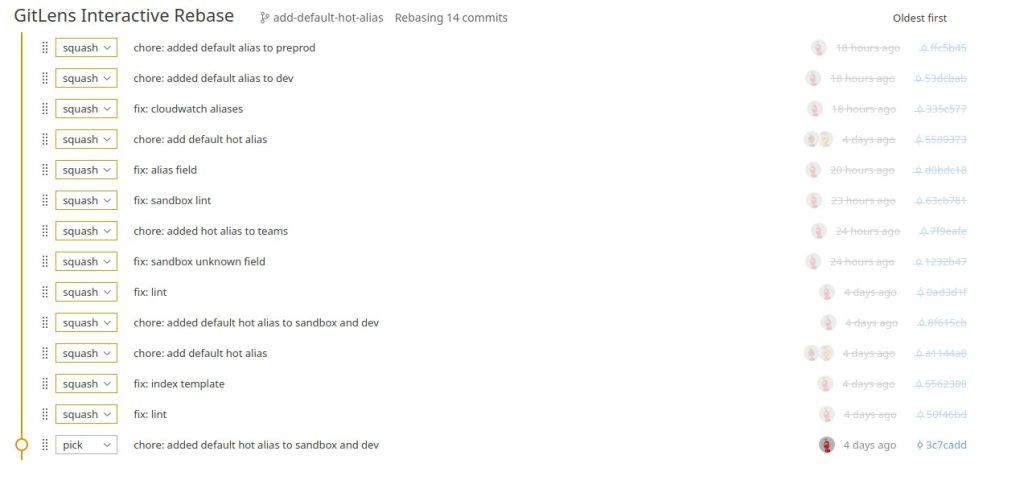
git rebase -i origin/main
git push –force-with-lease
Nur ein commit:
Visual Studio
git rebase -i origin/main
Alterster Commit: pick
Alle anderen: fixup
Dann: git push –force-with-lease
- VNets
- Virtual Networks sind separiert von anderen virtual Networks und können als physical Networks gesehen werden.
- Ressources (VMs, DBs,…) können per default im eigenen VNet communizieren aber nicht in anderen VNets
- VNets sind kostenfrei, aber limitiert bis 50 über alle Regions
- VNets sind nicht Region übergreifend.
- VNets können via „Peering“ verbunden werden
- VNets sind in Subnetze unterteilt (CIDR Notation) max. 65.536 IP Adressen
- VNets sind mit NSG geschützt, die aber den Subnets zugeordnet sind.
- z.B.: 10.0.0.0/16 = 10.0.0.0 – 10.0.255.255 (65.536 addresses)
- Die Azure Firewall kann einem VNet zugewiesen werden (https://learn.microsoft.com/de-de/azure/firewall/overview).
- Always minimize the Access to the Ressources in a VNet
- SubNets
- logisches Segment in einem VNet
- bekommt einen IP Bereich aus dem VNet
- Ressourcen werden in einem Subnet deplyed und nicht direkt im VNet
- Subnetze im selben VNet können untereinander kommunizieren
- Subnetze sind kostenfrei, es gibt ein Limit von 3000
- z.B. : 10.0.0.0 – 10.0.0.255 (/24) (256 addresses)
- Front und Backend Services können in verschiedene Subnetze deployed werden
- Load Balancer
- Application Gateway
- Network Security Group (NSG)
- Filter Regeln (Security Rule) nach SourceIP, SourcePort, DestinationIP, DestinationPort, Protokoll
- Network Peering
- Verbindet zwei VNets
- NSG können angewand werden
- Traffic wird berechnet mit 1ct pro GB (jeweils inbound und outbound)
1. Verschiedene Subnetze im selben VNET
Dies ist die häufigste und empfohlene Praxis in vielen Umgebungen. Die Idee ist, Frontend und Backend in getrennten Subnetzen innerhalb desselben Virtual Network zu platzieren.
Vorteile:
- Segmentierung und Sicherheit: Frontend- und Backend-Services können getrennt werden, und Firewall-Regeln oder NSGs (Network Security Groups) können implementiert werden, um den Zugriff nur auf das Nötigste zu beschränken. Beispielsweise könnte das Backend-Subnetz nur Anfragen vom Frontend akzeptieren und keine direkte Verbindung zum Internet haben.
- Leichtes Routing: Da sich beide Subnetze im selben VNET befinden, ist das Routing zwischen ihnen einfach und performant. Es ist keine zusätzliche Konfiguration für die Kommunikation zwischen den Services nötig.
- Sicherheit auf Layer-3 (Netzwerk): Durch die Trennung in Subnetze können Zugriffskontrollen feiner granuliert werden. Regeln können beispielsweise sicherstellen, dass das Frontend auf das Backend zugreifen kann, aber nicht umgekehrt.
- Kosteneffizienz: Da alles im selben VNET bleibt, gibt es keine zusätzlichen Kosten oder Komplexität für die Verbindung von verschiedenen VNETs (z.B. Peering oder Gateways).
Wann sinnvoll?:
- Wenn beide Services regelmäßig miteinander kommunizieren müssen (z.B. API-Aufrufe des Frontends an das Backend).
- Wenn Sicherheit durch Netzwerksicherheit (Subnetz, Firewalls, NSGs) erreicht werden soll.
- Wenn die Verwaltung einfach bleiben soll und der Overhead einer separaten Netzwerkverwaltung vermieden werden soll.
2. Verschiedene VNETs für Frontend und Backend
In einigen Szenarien kann es sinnvoll sein, Frontend und Backend in verschiedenen Virtual Networks zu deployen. Dies bietet zusätzliche Isolation, kommt aber auch mit mehr Komplexität.
Vorteile:
- Stärkere Isolation: Durch die Verwendung von separaten VNETs können Sie eine noch stärkere Trennung zwischen Frontend und Backend erreichen. Dies ist besonders nützlich, wenn es notwendig ist, die Umgebung stark voneinander zu isolieren (z.B. aus regulatorischen oder Compliance-Gründen).
- Erweiterte Sicherheitskontrollen: Separate VNETs ermöglichen eine noch granularere Kontrolle über die Netzwerkkommunikation. Sie können striktere VNET-Peering-Regeln festlegen oder Gateways zur Kommunikation zwischen VNETs verwenden.
- Multi-Cloud oder Multi-Regionen: Wenn Ihr Frontend in einer anderen Cloud oder einer anderen Region läuft, ist ein separates VNET möglicherweise erforderlich. Das Backend könnte in einer anderen Cloud-Umgebung liegen, um Daten geografisch oder aus Compliance-Gründen zu trennen.
Nachteile:
- Komplexität: Die Verwaltung mehrerer VNETs bringt zusätzliche Komplexität. Sie müssen VNET-Peering oder andere Netzwerktechnologien konfigurieren, um sicherzustellen, dass die beiden Netzwerke miteinander kommunizieren können.
- Kosten: VNET-Peering oder die Verwendung von Gateways (z.B. VPN oder ExpressRoute) zwischen VNETs kann zusätzliche Kosten verursachen.
- Leistungsüberlegungen: Die Latenz kann zunehmen, wenn die Kommunikation zwischen zwei verschiedenen VNETs über ein Gateway oder andere Netzwerkmechanismen erfolgt.
Wann sinnvoll?:
- Wenn Sie eine besonders starke Trennung zwischen Frontend und Backend benötigen (z.B. um strenge Sicherheitsvorgaben zu erfüllen).
- Wenn Ihre Frontend- und Backend-Services in unterschiedlichen Regionen oder Cloud-Providern betrieben werden.
- Wenn Sie eine hoch skalierbare Multi-Tenant-Architektur haben, bei der jeder Teil einer Anwendung in einer eigenen isolierten Umgebung liegt.
Zusammenfassung:
- Verschiedene Subnetze innerhalb desselben VNET:
- Die bevorzugte Lösung für die meisten Anwendungsfälle.
- Einfaches Routing, hohe Effizienz und ausreichende Sicherheit.
- Ideal, wenn Frontend und Backend regelmäßig miteinander kommunizieren müssen.
- Verschiedene VNETs:
- Mehr Isolation und Sicherheit, aber komplexer und kostspieliger.
- Sinnvoll, wenn besonders hohe Sicherheitsanforderungen bestehen oder wenn die Systeme stark voneinander getrennt sein müssen (z.B. aus Compliance-Gründen oder in Multi-Region-Szenarien).
In den meisten Fällen ist es effizienter und einfacher, Frontend- und Backend-Services in getrennte Subnetze innerhalb desselben VNET zu deployen. Separate VNETs sind eher in speziellen Szenarien mit besonderen Anforderungen erforderlich.
Journalbeat installieren
sudo apt install journalbeatJournalbeat konfigurieren (vi /etc/journalbeat/journalbeat.yml)
logging.level: info
logging.to_files: true
logging.files:
path: /var/log/journalbeat
name: journalbeat
keepfiles: 7
permissions: 0644
journalbeat.inputs:
- paths: []
seek: head
output.logstash:
# Boolean flag to enable or disable the output module.
enabled: true
ssl.enabled: false
# Graylog host and the beats input
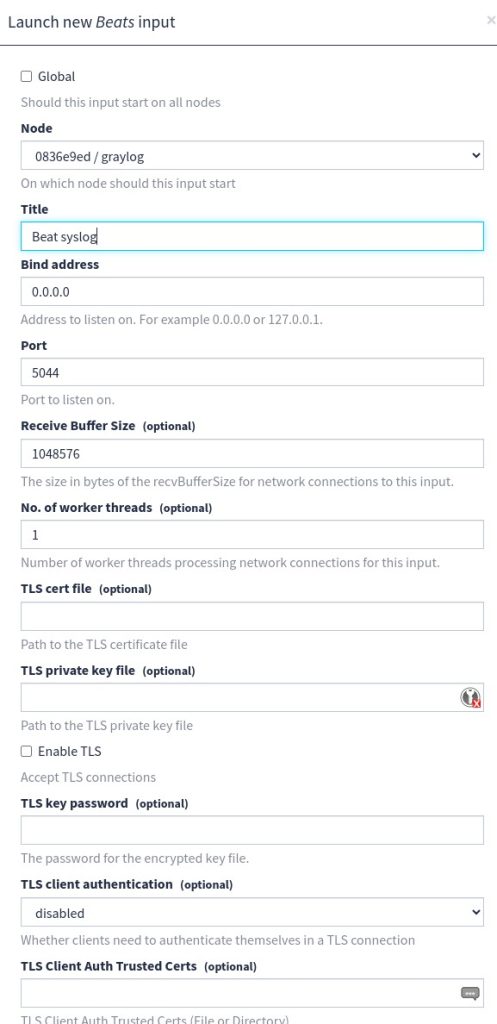
hosts: ["127.0.0.1:5044"]Beat input in Graylog konfigurieren
Journalbeat starten
systemctl start journalbeat
systemctl enable journalbeat
systemctl status journalbeatSchritt 1: Inputs einrichten (Logquellen definieren)
Zunächst musst du einen Input einrichten, der die Logs verarbeitet. Für Demo-Zwecke könntest du z.B. Syslog verwenden, um Logs von deinem eigenen Server oder einem anderen Gerät zu sammeln.
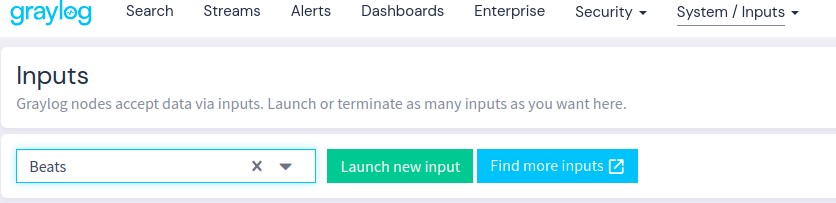
- Gehe in der Graylog-Oberfläche auf System → Inputs.
- Wähle unter Select input den Syslog UDP-Input (oder einen anderen Input) aus und klicke auf Launch new input.
- Gib deinem Input einen Namen (z.B. „Syslog UDP“) und wähle den Node (normalerweise deinen lokalen Graylog-Server).
- Stelle sicher, dass der Port korrekt ist (normalerweise 514 für Syslog).
- Klicke auf Save.
Jetzt ist dein Graylog-System bereit, Logs über den konfigurierten Input zu empfangen.
Schritt 2: Testdaten generieren
Um Testdaten zu simulieren, kannst du einige Syslog-Nachrichten direkt auf deinem Server erzeugen, wo Graylog läuft, oder Daten von anderen Servern an den Syslog-Input senden.
Beispiel: Syslog-Daten lokal senden
Auf deinem Linux-Server kannst du Syslog-Nachrichten über logger generieren. Öffne ein Terminal und sende einige Nachrichten:
logger -n 127.0.0.1 -P 514 "Test log message from local system"Dies sendet eine Test-Syslog-Nachricht an deinen Graylog-Server, der auf localhost (127.0.0.1) auf Port 514 lauscht.
Beispiel: Weitere Testdaten erzeugen
Du kannst ein Skript verwenden, um kontinuierlich Log-Nachrichten zu senden und zu testen, wie Graylog mit größeren Datenmengen umgeht. Hier ein Beispiel für ein Bash-Skript:
#!/bin/bash
for i in {1..100}
do
  logger -n 127.0.0.1 -P 514 "Test log message number $i"
  sleep 1
done
Das Skript sendet 100 Nachrichten mit einer Sekunde Verzögerung. Dies hilft dir, zu sehen, wie Graylog die Logs in Echtzeit verarbeitet.
Schritt 3: Logs in Graylog durchsuchen
Nachdem du einige Logs erzeugt hast, kannst du sie in Graylog durchsuchen:
- Gehe in der Graylog-Oberfläche auf Search.
- Wähle den gewünschten Zeitraum (z.B. „Last 5 minutes“) und klicke auf Search.
- Du solltest die gesendeten Logs in der Liste sehen. Du kannst die Logs durch Filter und Suchabfragen weiter eingrenzen.
Schritt 4: Dashboards erstellen
Um die Logs besser zu visualisieren, kannst du ein Dashboard in Graylog erstellen.
- Gehe auf Dashboards → Create new dashboard.
- Gib dem Dashboard einen Namen und klicke auf Create.
- Füge Widgets hinzu, um verschiedene Aspekte deiner Logs zu visualisieren (z.B. Log-Level, Häufigkeit bestimmter Ereignisse usw.).
Mit diesen Schritten hast du eine grundlegende Testumgebung mit Demo-Daten in Graylog eingerichtet. Du kannst jetzt die Logs analysieren, Dashboards erstellen und die Funktionen der Plattform erkunden.
Schritt 1: System aktualisieren
Zuerst sollten wir sicherstellen, dass das System auf dem neuesten Stand ist.
sudo apt update && sudo apt upgrade -ySchritt 2: Installiere Java (OpenJDK 11)
Graylog erfordert Java, das du mit folgendem Befehl installieren kannst:
sudo apt install openjdk-11-jre-headless -yStelle sicher, dass Java korrekt installiert wurde:
java -versionSchritt 3: Installiere MongoDB
Graylog benötigt MongoDB als Datenbank.
- MongoDB-Repository hinzufügen:
wget -qO - https://www.mongodb.org/static/pgp/server-4.4.asc | sudo apt-key add -
echo "deb [ arch=amd64 ] https://repo.mongodb.org/apt/ubuntu focal/mongodb-org/4.4 multiverse" | sudo tee /etc/apt/sources.list.d/mongodb-org-4.4.list
sudo apt update- MongoDB installieren:
sudo apt install -y mongodb-org- MongoDB starten und beim Boot aktivieren:
sudo systemctl start mongod
sudo systemctl enable mongod
Schritt 4: Installiere Elasticsearch
Graylog verwendet Elasticsearch zur Indizierung und Speicherung von Log-Daten.
- Elasticsearch-Repository hinzufügen:
wget -qO - https://artifacts.elastic.co/GPG-KEY-elasticsearch | sudo apt-key add -
echo "deb https://artifacts.elastic.co/packages/7.x/apt stable main" | sudo tee /etc/apt/sources.list.d/elastic-7.x.list
sudo apt update- Elasticsearch installieren:
sudo apt install elasticsearch -y- Elasticsearch konfigurieren: Öffne die Konfigurationsdatei und aktiviere die Netzwerkschnittstelle, falls du Elasticsearch nicht nur lokal verwenden möchtest:
sudo vi /etc/elasticsearch/elasticsearch.ymlEntferne die Kommentare vor network.host und cluster.name, und passe sie an:
cluster.name: graylog
network.host: 127.0.0.1- Elasticsearch starten und beim Boot aktivieren:
sudo systemctl start elasticsearch
sudo systemctl enable elasticsearch
Schritt 5: Installiere Graylog
Jetzt kannst du Graylog installieren.
- Graylog-Repository hinzufügen:
wget https://packages.graylog2.org/repo/packages/graylog-4.3-repository_latest.deb
sudo dpkg -i graylog-4.3-repository_latest.deb
sudo apt update- Graylog installieren:
sudo apt install graylog-server -ySchritt 6: Graylog konfigurieren
- Öffne die Konfigurationsdatei von Graylog:
sudo vi /etc/graylog/server/server.conf- Setze das
password_secret(generiere ein sicheres Passwort):
pwgen -N 1 -s 96Füge den generierten Wert in die Datei server.conf unter password_secret ein.
- Setze das
root_password_sha2(Admin-Passwort für das Graylog-Interface):
echo -n 'deinPasswort' | sha256sumFüge den generierten SHA256-Hash in die Datei unter root_password_sha2 ein.
- Stelle sicher, dass
http_bind_addressauf0.0.0.0:9000gesetzt ist, damit du auf die Web-Oberfläche zugreifen kannst:
http_bind_address = 0.0.0.0:9000Schritt 7: Graylog starten
Jetzt kannst du Graylog starten und den Dienst aktivieren:
sudo systemctl start graylog-server
sudo systemctl enable graylog-server
Schritt 8: Zugriff auf die Graylog-Weboberfläche
Öffne deinen Webbrowser und navigiere zu:
http://<Deine-IP-Adresse>:9000Melde dich mit dem Benutzernamen admin und dem Passwort an, das du zuvor unter root_password_sha2 gesetzt hast.
kubectl create secret generic azure-secrets --from-env-file <(jq -r "to_entries|map(\"\(.key)=\(.value|tostring)\")|.[]" azure-credentials.json)Operator mit Helm installieren
helm repo add external-secrets https://charts.external-secrets.io
helm install external-secrets external-secrets/external-secrets
Erstellung eines Azure Service Principals
provider "azurerm" {
  features {}
}

provider "kubernetes" {
  config_path = "~/.kube/config"
}

provider "azuread" {
  tenant_id = data.azurerm_client_config.current.tenant_id
}

data "azurerm_client_config" "current" {}

resource "azuread_application" "eso_app" {
  display_name = "external-secrets-operator"
}

resource "azuread_service_principal" "eso_sp" {
  application_id = azuread_application.eso_app.application_id
}

resource "azuread_service_principal_password" "eso_sp_password" {
  service_principal_id = azuread_service_principal.eso_sp.id
  value                = random_password.sp_password.result
  end_date             = "2099-01-01T00:00:00Z"
}

resource "random_password" "sp_password" {
  length  = 32
  special = true
}

resource "azurerm_role_assignment" "kv_role_assignment" {
  principal_id   = azuread_service_principal.eso_sp.id
  role_definition_name = "Key Vault Secrets User"
  scope          = azurerm_key_vault.example.id
}

# Optional: Erstelle ein JSON-Dokument im Azure SDK-Format (wie azure-credentials.json)
locals {
  azure_credentials = jsonencode({
    clientId     = azuread_service_principal.eso_sp.application_id
    clientSecret = azuread_service_principal_password.eso_sp_password.value
    tenantId     = data.azurerm_client_config.current.tenant_id
    subscriptionId = data.azurerm_client_config.current.subscription_id
    activeDirectoryEndpointUrl = "https://login.microsoftonline.com"
    resourceManagerEndpointUrl = "https://management.azure.com/"
    activeDirectoryGraphResourceId = "https://graph.windows.net/"
    sqlManagementEndpointUrl = "https://management.core.windows.net:8443/"
    galleryEndpointUrl = "https://gallery.azure.com/"
    managementEndpointUrl = "https://management.core.windows.net/"
  })
}

# Kubernetes Secret für Service Principal erstellen
resource "kubernetes_secret" "azure_secrets" {
  metadata {
    name      = "azure-secrets"
    namespace = "default"
  }

  data = {
    "azure-credentials.json" = base64encode(local.azure_credentials)
  }
}
Erklärung der Ressourcen:
azuread_application: Erstellt die Azure AD Anwendung, die den Service Principal repräsentiert.azuread_service_principal: Erstellt den Service Principal für die Anwendung.azuread_service_principal_password: Erstellt ein Kennwort (Client Secret) für den Service Principal.azurerm_role_assignment: Weist dem Service Principal die RolleKey Vault Secrets Userfür den Zugriff auf den Key Vault zu.kubernetes_secret: Erstellt ein Kubernetes Secret, das die Azure-Anmeldeinformationen imazure-credentials.json-Format speichert. Das JSON wird mithilfe derlocal-Variable generiert.
Oder per CLI:
$ az ad sp create-for-rbac --name "external-secrets-operator" --sdk-auth > azure-credentials.json

$ kubectl create secret generic azure-secrets --from-env-file <(jq -r "to_entries|map(\"\(.key)=\(.value|tostring)\")|.[]" azure-credentials.json)
Secretstore anlegen
apiVersion: external-secrets.io/v1beta1
kind: SecretStore
metadata:
  name: example-secret-store
spec:
  provider:
    azurekv:
      tenantId: "xxxxx-xxx-xxxx-xxxx-xxxxxxx"
      vaultUrl: "https://xxxxx.vault.azure.net"
      authSecretRef:
        clientId:
          name: azure-secrets
          key: clientId
        clientSecret:
          name: azure-secrets
          key: clientSecret
Externalsecret anlegen
apiVersion: external-secrets.io/v1beta1
kind: ExternalSecret
metadata:
  name: example-external-secret
spec:
  refreshInterval: 1h
  secretStoreRef:
    kind: SecretStore
    name: example-secret-store

  target:
    name: secret-to-be-created
    creationPolicy: Owner

  data:
  - secretKey: secret-key
    remoteRef:
key: secret-keyOptional: Repo hinzufügen
helm repo add argo https://argoproj.github.io/argo-helm
helm repo update
Repo nach vorhandenen Charts durchsuchen:
helm search repo argo
NAME                            CHART VERSION   APP VERSION     DESCRIPTION
argo/argo                       1.0.0           v2.12.5         A Helm chart for Argo Workflows
argo/argo-cd                    7.6.6           v2.12.4         A Helm chart for Argo CD, a declarative, GitOps...
argo/argo-ci                    1.0.0           v1.0.0-alpha2   A Helm chart for Argo-CI
argo/argo-events                2.4.8           v1.9.2          A Helm chart for Argo Events, the event-driven ...
argo/argo-lite                  0.1.0                           Lighweight workflow engine for Kubernetes
argo/argo-rollouts              2.37.7          v1.7.2          A Helm chart for Argo Rollouts
argo/argo-workflows             0.42.4          v3.5.11         A Helm chart for Argo Workflows
argo/argocd-applicationset      1.12.1          v0.4.1          A Helm chart for installing ArgoCD ApplicationSet
argo/argocd-apps                2.0.1                           A Helm chart for managing additional Argo CD Ap...
argo/argocd-image-updater       0.11.0          v0.14.0         A Helm chart for Argo CD Image Updater, a tool ...
argo/argocd-notifications       1.8.1           v1.2.1          A Helm chart for ArgoCD notifications, an add-o...
gewünschtes Helm Chart pullen
helm pull argo/argo-cdHelm Chart entpacken
tar -xvf argo-cd-7.6.6.tgzHelm Repo hinzufügen
helm repo add jetstack https://charts.jetstack.io --force-update
helm install \
  cert-manager jetstack/cert-manager \
  --namespace cert-manager \
  --create-namespace \
  --version v1.15.3 \
  --set crds.enabled=true
ClusterIssuer konfigurieren
apiVersion: cert-manager.io/v1
kind: ClusterIssuer
metadata:
  name: letsencrypt
spec:
  acme:
    server: https://acme-v02.api.letsencrypt.org/directory
    email: ta@example.com
    privateKeySecretRef:
      name: example-issuer-account-key
    solvers:
    - http01:
        ingress:
ingressClassName: nginx! Spot node pool can’t be a default node pool, it can only be used as a secondary pool.
Hier der default Node Pool:
resource "azurerm_kubernetes_cluster" "aks" {
  name                = "aks-demo-cluster"
  location            = azurerm_resource_group.aks_rg.location
  resource_group_name = azurerm_resource_group.aks_rg.name
  dns_prefix          = "aksdemocluster"

  default_node_pool {
    name       = "default"
    node_count = 1
    vm_size    = "Standard_DS2_v2"
  }

  identity {
    type = "SystemAssigned"
  }

  network_profile {
    network_plugin    = "azure"
    load_balancer_sku = "Standard"
  }

  tags = {
    environment = "Demo"
  }
}
Hier ein Spot Node Pool:
resource "azurerm_kubernetes_cluster_node_pool" "spot_pool" {
  name                  = "spotpool"
  kubernetes_cluster_id = azurerm_kubernetes_cluster.aks.id
  vm_size               = "Standard_DS2_v2"
  node_count            = 1
  enable_auto_scaling   = true
  min_count             = 1
  max_count             = 3
  priority              = "Spot"
  eviction_policy       = "Delete"
  spot_max_price        = -1  # Nutzt den aktuellen Spot-Preis

  tags = {
    environment = "Spot"
  }
}
Erklärung:
default_node_pool: Ein minimaler Node Pool, der verwendet wird, um das Cluster initial zu erstellen.azurerm_kubernetes_cluster_node_pool: Hier wird ein zusätzlicher Node Pool erstellt, der Spot-Instanzen und Autoscaling unterstützt. Dieser Pool wird mit dem Haupt-Cluster verbunden.
Wichtige Hinweise:
- Autoscaling und Spot-Instanzen müssen in separaten Node Pools konfiguriert werden.
- Wenn du einen Spot-Node Pool nutzt, ist es eine gute Praxis, immer einen regulären Node Pool (wie
default_node_pool) zu behalten, da Spot-Instanzen potenziell jederzeit entfernt werden können.